The Cisco ASA and FTD have a nice usability feature for client software distribution when running AnyConnect: by default, you can leverage the ASA/FTD itself as the AnyConnect software repository for your end-users. Navigating in a browser to your RAVPN URL will bring up the WebVPN login screen, which allows the end-user to authenticate and access any defined WebVPN resources (if configured and on ASA only), or to download the AnyConnect client software package. What if you don’t want HTTPS logins even presented as an option, though? If you’re managing the AnyConnect client software distribution via some other means like MDM or initial device imaging, you might want to shut the page down completely and remove it as another access vector to worry about.
Since the headend needs an SSL/TLS listener open on whatever port you have configured (TCP:443 by default) in order to establish AnyConnect client connectivity, you can’t simply disable the listener, and changing to a nonstandard port just adds trivial obfuscation without really providing a solution (not to mention dealing with a port append/PAT in your configs and/or user experience, which can be annoying).

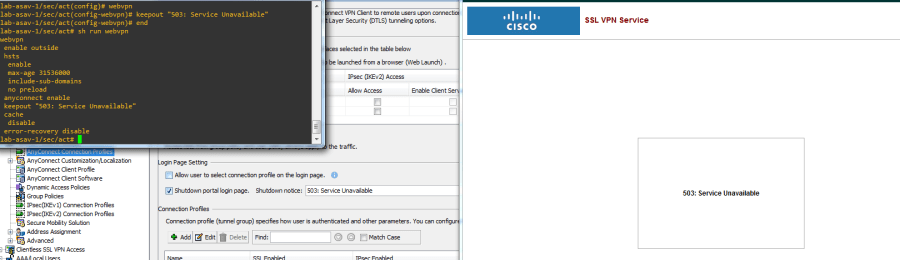
The ASA has a feature in both CLI and ASDM to disable login access to the WebVPN portal while still allowing the listener to be alive for incoming client VPN connections; in ASDM its the Shutdown portal login page checkbox, and in the CLI its the keepout command entered under the global webvpn config. The FTD, as of version 6.7, still does not present this option in the AnyConnect configuration in FMC or via FDM.

Does this mean all is lost? Of course not! If we SSH into the FTD, we can see that the webvpn CLI syntax is quite similar to ASA, even if we aren’t able to directly manipulate it:

We also know that Cisco has been kind enough to offer a unique and powerful advanced feature within FMC/FTD called FlexConfig, which allows us to enable LINA (aka ASA) configuration changes which may not yet be available in the FMC directly (at our own discretion and risk, of course 🙂 ). Using FlexConfig, we can create a very simple policy which can add our keepout command into the webvpn config and allow us to shut down the WebVPN portal login page while still allowing the use of AnyConnect client VPN.
Before continuing, be aware that FlexConfig policies are essentially a way to manually add configurations directly to the LINA engine outside the scope of the FMC; they should be very well understood and tested outside of production, otherwise you stand a very real chance of breaking your configuration if things are entered erroneously.
With great power comes great responsibility.
In-depth discussion of FlexConfig is outside the scope of this article, but you may find a bevy of information on the topic here.
The first thing we will need to do is create our FlexConfig object(s), which will be referenced in the FlexConfig policy. There are two types of objects involved with FlexConfig: Text Objects, which represent defined variables, and FlexConfig Objects, which represent policy elements and may reference Text Objects to create configurations using programmatic language.
For our use case, we will create the config in plain-text using just a FlexConfig Object; well, actually, two: one to add the configuration we want, and another we would use to remove the configuration if desired in the future.
In FMC, lets go to Objects > Object Management > FlexConfig > FlexConfig Object and click Add FlexConfig Object:

We’ll name the object and then in the main text box, simply type the relevant CLI commands as you would if you were to enter them in an ASA. Take note of the Deployment option which is set to once; this dictates whether this configuration will be “entered” every time the FlexConfig policy we attach to the FTD is deployed, (that is, every time you deploy policy to the FTD), or if it will just be entered one time unless the FlexConfig Object configuration is changed. In our case, issuing the commands just once is sufficient, since this is a pretty static configuration change and there should be no FTD-relevant commands that will negate it as of the time of this writing on version 6.7. Click Save.

Create another object now to remove this configuration by issuing the “no” keyword in our keepout statement, again just like you would do were this in the ASA CLI. Click Save.

Next, we’ll go to Devices > FlexConfig and click Add a new policy, name it and select the FTD we want to apply it to, and click Save.

On the policy page, in the left column you should see the two FlexConfig Objects we created under the User Defined header – you can filter by name using the search box if needed. Select the FlexConfig Object we created to configure the keepout feature and hit the [ > ] button to add it to the policy; by default it will land in the Append section, which is fine for our purposes. Clicking the magnifying glass next to the object in the policy will show the details of the configuration, and should reflect the config we added earlier in an un-editable format. Click Save.

You can also click Preview Config to see the entire config which will be pushed by the FMC the next time the policy is deployed, including the FlexConfig policy changes at the end since we are Appending.


Click Deploy > Deployment, select your device and hit Deploy. You will see a warning saying, basically, “we don’t validate every line of your config so please make sure it is correct” – this is just a general warning and not necessarily an indication that you’ve made a mistake. The syntax which may be used in more advanced policies can include recursion and other programmatic concepts which aren’t part of LINA CLI syntax, and is meant to be open-ended for advanced users to create configuration as they see fit, so there isn’t a lot of validation done here. Its generally a good idea to double-check your syntax for typos and line breaks and other errors before deploying. When you’re sure you’re good to go, hit Deploy again under the warning to push the configuration.
Once the deployment is completed, lets go back to our SSH session on the FTD and check out the webvpn config section again:


Looking good! Checking the RAVPN-enabled interface IP/FQDN in a browser is the real test, and should show us the 503: Service Unavailable message we configured. That message by the way is totally customizable and can be any text string you’d like.
Congrats, you have successfully shut down another attack vector! Speaking of which, lets say you have some emergency situation come up now and you need to use this portal for software distribution again, what do we do? Well, simply change the FlexConfig Policy to use the unconfigure object we created, hit Deploy, and it will remove our keepout config. Just make sure to delete the configure object from the policy first.

Once the deployment is finished, we should be back in business. When you need to shut it down again, simply flip the policy back the way it was originally and re-deploy.

Be aware that with FlexConfig, removing a policy from the device does not remove the associated configurations that the FlexConfig policy pushed; you must use FlexConfig Objects to issue the “no” version of your configurations you would like to remove in order to remove them. This was the purpose behind setting up the unconfigure object, since that logic should always be followed when using FlexConfig.
This was a simple example of one way this could be accomplished on FTD using FlexConfig, and there are certainly others as FlexConfig offers a lot of flexibility in how configuration is written and applied. Below shows another way to accomplish the same configuration using both Text Objects and FlexConfig Objects which reference the Text objects as variables – this is probably overkill for this type of configuration change, but is certainly still an option.

FlexConfig is a nice tool to have available on the FTD platform and, when used carefully, can help you customize your environment exactly as you need it even if the features aren’t available in the FMC just yet 🙂

