In this article, we’ll take a look at deploying a Meraki Virtual MX (vMX) in Microsoft Azure, and enabling a basic AnyConnect configuration on it for remote access VPN. This configuration includes a couple of specific steps required on the Azure side in order to properly allow inbound Anyconnect traffic to the vMX. Additional configurations for external authentication with ISE and SAML IdPs, Azure resource routing, and high availability using azure functions will be covered in future articles.
Workflow:
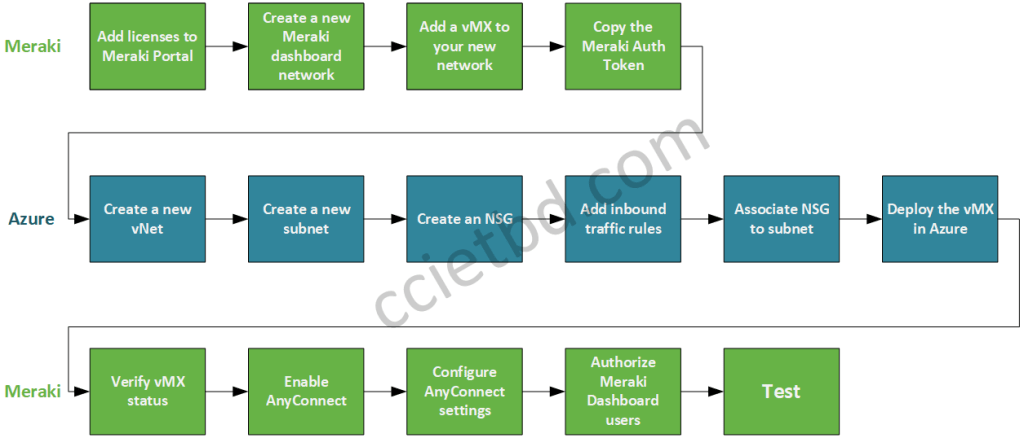
Add licenses to Meraki portal
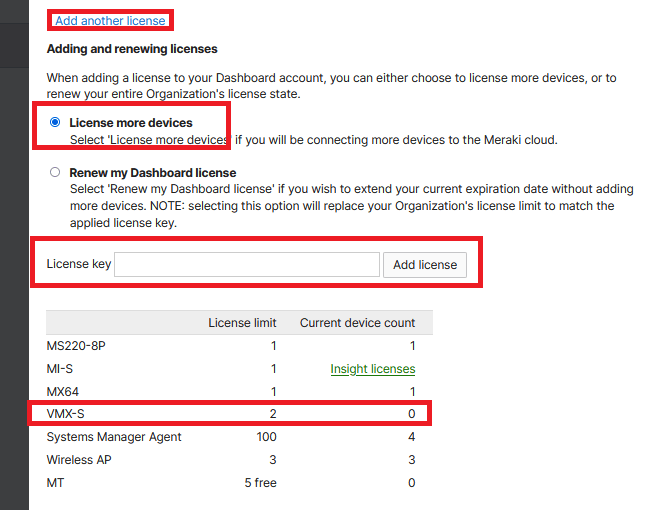
On the Meraki Portal, navigate to Organization > Configure > License Info. Click Add another license, select License more devices, add your vMX license key(s), review the changes, and then verify that you see the VMX licenses available in the pool based on the SKU (VMX-S/M/L) you have purchased.
Create a new network
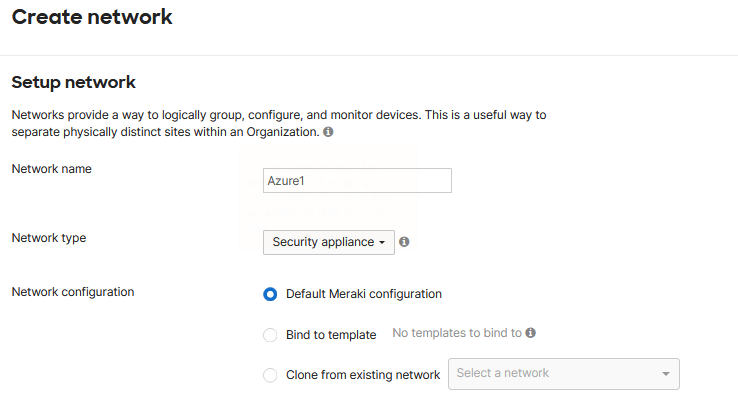
Next, click on the Network drop-down in the left menu and select Create a new network. Once there, give your network a name, set the type to Security Appliance, use the Default Meraki Configuration, and choose Create Network.
Add a vMX to your new network
Once created, you can click on the network and should be greeted with a message asking you to add a vMX – go ahead and click the Add vMX button.

Copy the Meraki Auth Token
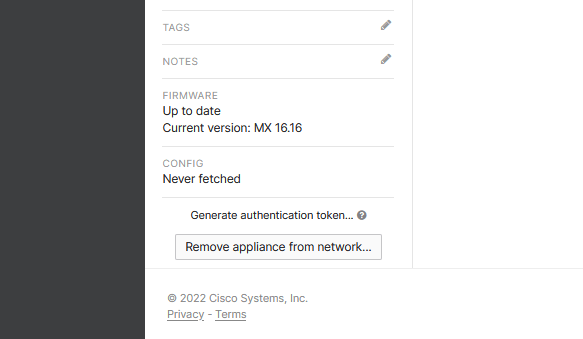
After a moment you should be presented with the familiar security appliance status page – here you can feel free to give your vMX a name, add a location, change the DYNDNS hostname if desired, add stages and notes, etc. Once you’re finished, make your way to the bottom left of the screen, click the Generate authentication token link, and note the token string.
Be aware that the token expires in an hour – don’t do this step until you are ready to move right over to Azure and begin deployment.
Create a new vNet and subnet
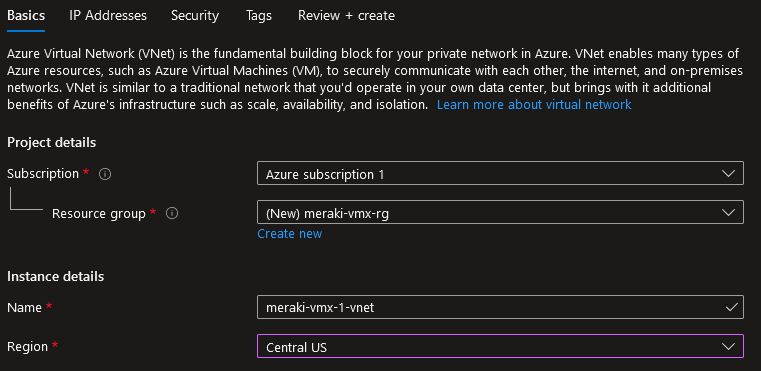
Log into your Azure tenant, click Create Resource, and search for Virtual Network, then click Create.

Choose a resource group you want to use to house your vMX and associated components or create a new one. Give your vNet a name, choose a region, and click Next.
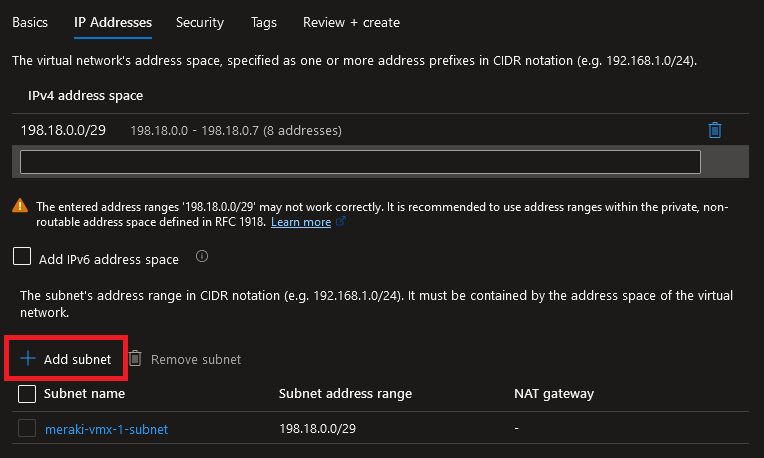
Enter the address space you would like to use, click Add subnet, and create a subnet within the vNet address space, then click Review + create. If everything looks good, hit the Create button to being deploying the new vNet.
Create a Network Security Group (NSG)
In the search bar at the top of the screen, search for Network Security Group, then click Create. Place the NSG in the same resource group and region we added the vNet to, give it a name, click Review + create, then click Create.

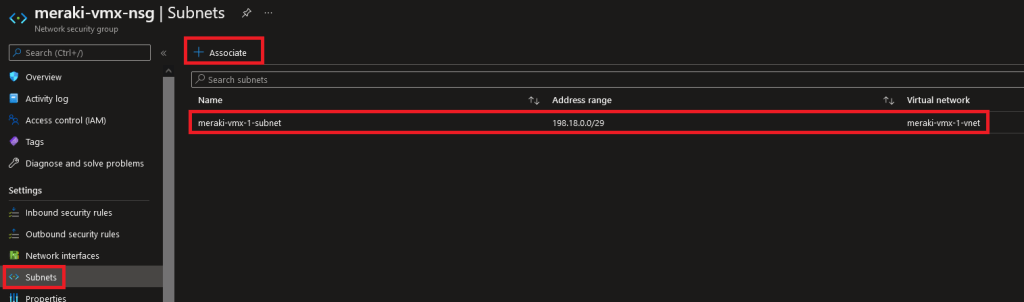
Add inbound traffic rules and associate to the subnet
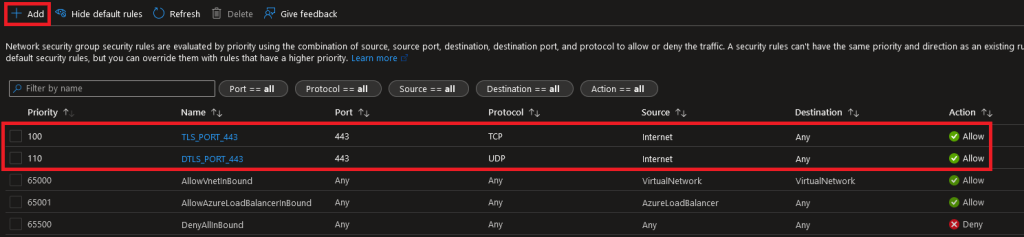
Go into your new NSG and click Inbound Security Rules in the left column. Click +Add at the top, and add two rules as shown below, one for inbound TCP:443 (SSL/TLS), and another for inbound UDP:443 (DTLS, which is preferred by AnyConnect).
Next, click Subnets in the left column, then click +Associate at the top. Select the new vNet and subnet we created earlier, and click OK.
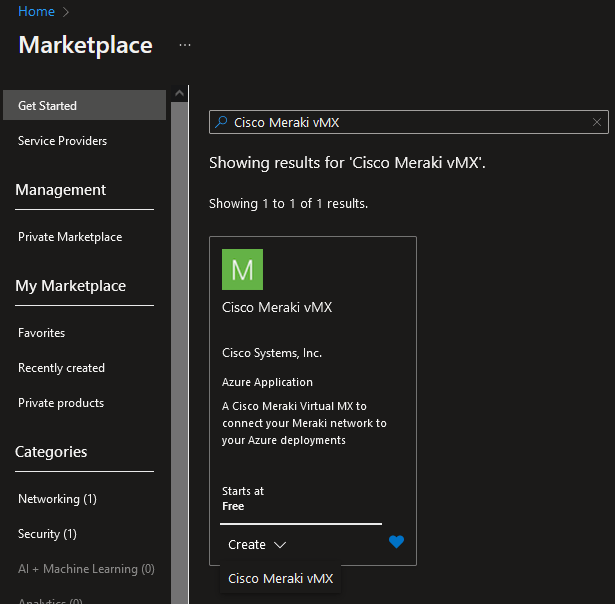
Deploy the vMX
Now for the fun part – we get to deploy the vMX! In the search bar at the top, type Marketplace. In the Marketplace, search for Cisco Meraki vMX, and click Create.
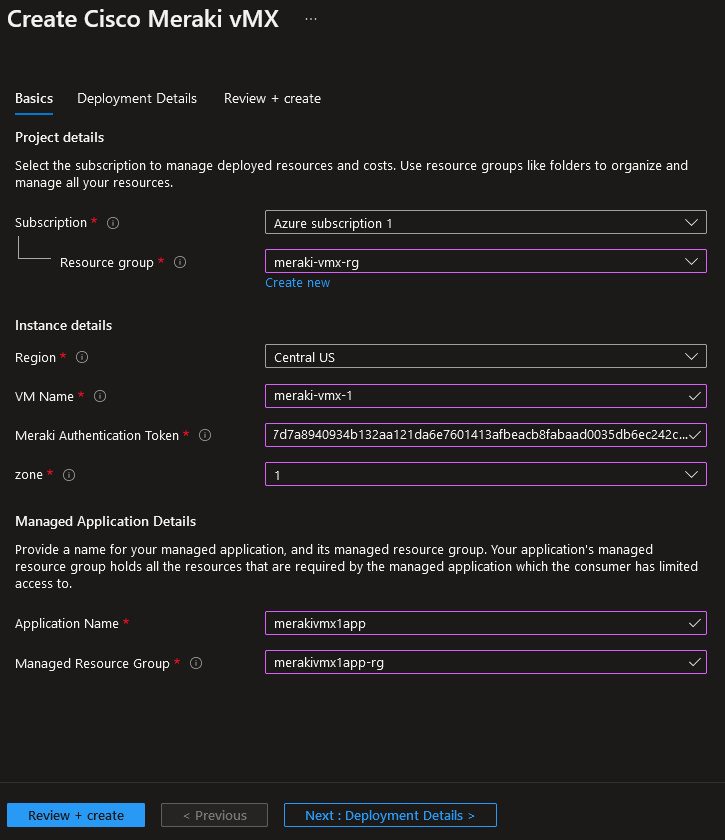
Here, we can fill in the required information.
- Resource group – choose the resource group we created earlier
- Region – choose the region we chose for the other components earlier
- VM Name – give your vMX a name
- Meraki Authentication Token – paste in your Meraki dashboard authentication token string
- zone – choose an availability zone for your vMX
- Application Name – give the managed app a name
- Managed Resource Group – give a name for the application to use when it creates the managed app resources
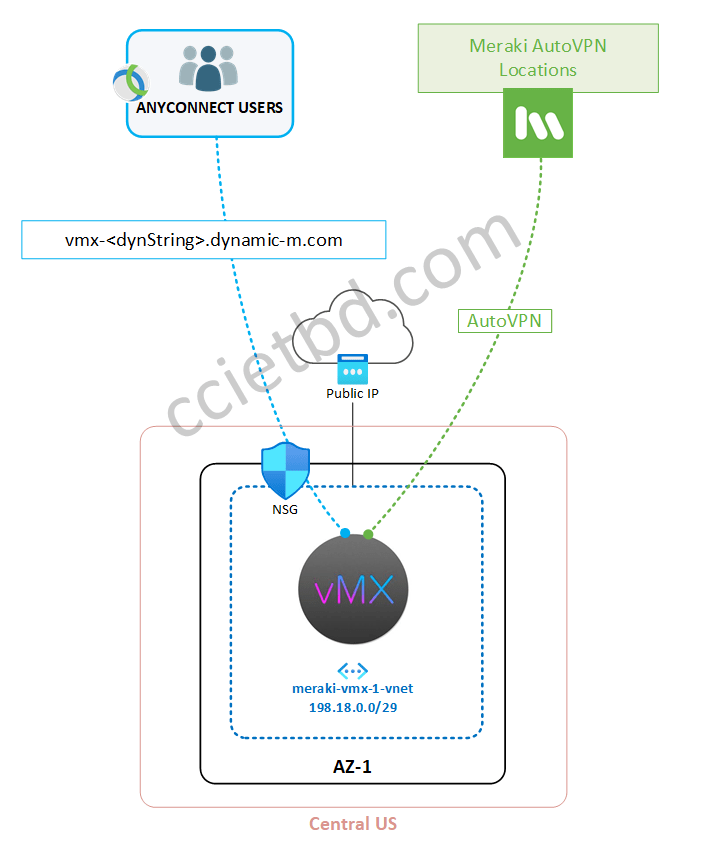
Notice that, towards the bottom, the last two fields are asking about what to name the managed app and the managed app’s resource group – this is why we pre-created the vNet, subnet, and NSG earlier – if you create a new vNet and subnet as part of the managed application deployment workflow, you will not be able to attach an NSG to the vMX and you will never be able to reach it for AnyConnect since you are disallowed from initiating traffic to the box by the app itself! However, if we pre-create the network components first and instruct the managed app to use them, we can circumvent the issue.
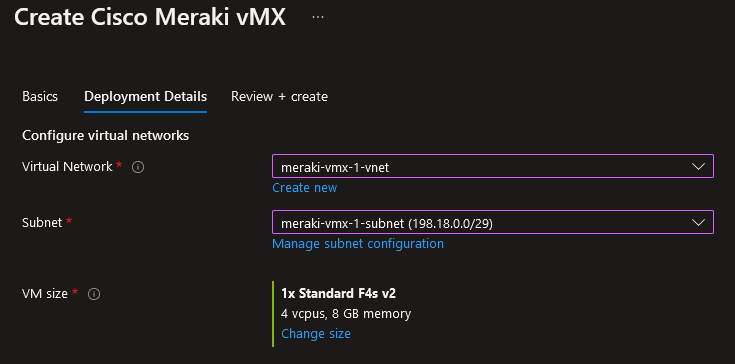
Click on Next: Deployment Details, and choose the vNet and Subnet we created earlier which have the NSG associated with them. Click Review + create, then Create.
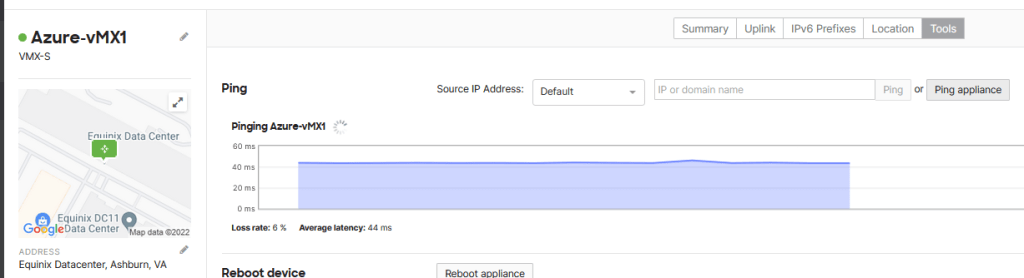
Verify vMX status
After 5-10 minutes depending on the region, your vMX should be deployed and checked into the Meraki dashboard. Back over on the dashboard, we can verify the connectivity and status from the Appliance Status page.
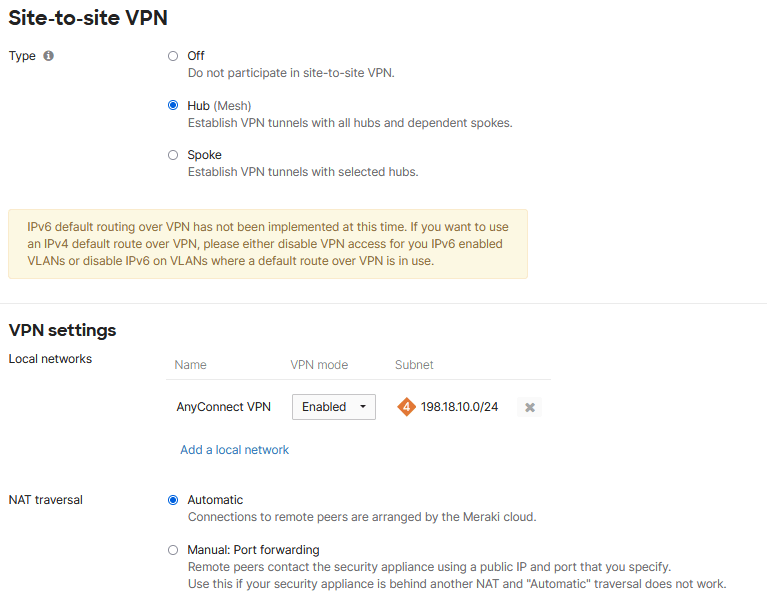
Success! With that done, you may optionally add the vMX to your SD-WAN AutoVPN Mesh at this time. Click Security & SD-WAN > Site-to-site VPN, then set the Type to Hub or Spoke depending on your topology. If desired, you can come back here later and enable VPN advertisement of your AnyConnect subnet, which we will configure in the next steps.
Enable and Configure AnyConnect
Navigate to Security & SD-WAN > Client VPN > AnyConnect, and set it to Enabled. Here, you are presented with a plethora of options and information:
- Hostname – the FQDN of the vMX which you will use to point your AnyConnect client to
- AC download links – links to download the AC clinet software as well as the optional profile editor
- Anyconnect port – by default, and recommended, this should be set to 443 – it may be changed, but keep in mind you must also update your NSG to allow the traffic in to your vMX!
- Log-in banner – an optional banner message to present to cleints when connecting to AnyConnect
- Profile Update – if enabled, you may created and upload an AnyConnect XML profile to the vMX for automatic deployment to clients when they connect
- Server Certificate Generation Method – the certificate which is installed on the vMX itself if, by default, provisioned and renewed by Meraki based onthe FQDN of the vMX. You can contact support to enable custom certification options as outlined here.
- Certificate Authentication – optionally you may enforce client certificate authentication
- Authentication type – by default the options available are Meraki Cloud authentication, Active Directory, and RADIUS – you may contact support to have the SAML option enabled as of the time of this writing
- AnyConnect VPN Subnet – the address pool which you want to assign to AnyConnect clients – make sure resources beyond your Meraki AutoVPN mesh have return routes to get to this subnet
- DNS Nameservers – you may defing google, Umbrella, or private DNs servers as well as a domain name suffix
- Client Routing and Dynamic Client Routing – Split inclue/exclude and fulle-tunnel configuration options for both Layer 3 and Layer 4 (DNS)-based traffic – note that the Azure vMX does not support any NAT-based configurations as of the time of this writing, and as such a full-tunnel option is not a valid configuration
- Default Group Policy – if desired, a group policy may be configured and applied by default to all connected VPN clients
Note that not all of these configurations options will be covered in detail in this article, though most will be covered in future articles. for additional information on these settings in the meantime, please view the Meraki documentation here.
For this example, I will be:
- Creating a VPN pool of 198.18.10.0/24 (and adding to AutoVPN advertisement as shown previously)
- Setting the Client Routing to Only include traffic going to 198.18.0.0/16
- Using Meraki Cloud Authentication
and leaving all other options default for now – note that creating an AnyConnect Profile is a good practice, especially when using the DYNDNS Meraki FQDN as an AnyConnect URL – we will cover that in the next article.
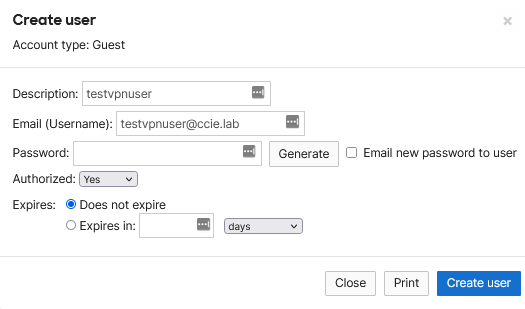
Create and Authorize Meraki Dashboard users
Navigate to Security & SD-WAN > Client VPN and scroll down to the User Management section. Here, we can click the Add new user button on the righthand side and create a user. Be sure to authorize the user for VPN.
Test your setup
The time has come: let’s test it out! Navigate to Security & SD-WAN > Client VPN > AnyConnect. Install the appropriate version of the AnyConnect client for your operating system using the provided download links, then copy the hostname information on the page (the FQDN if your vMX). Paste that into the AnyConnect client window, and click Connect. Enter the test user credentials we created and click OK.
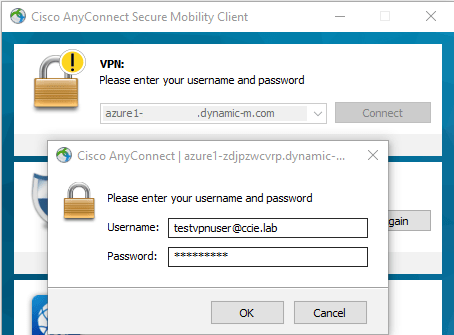
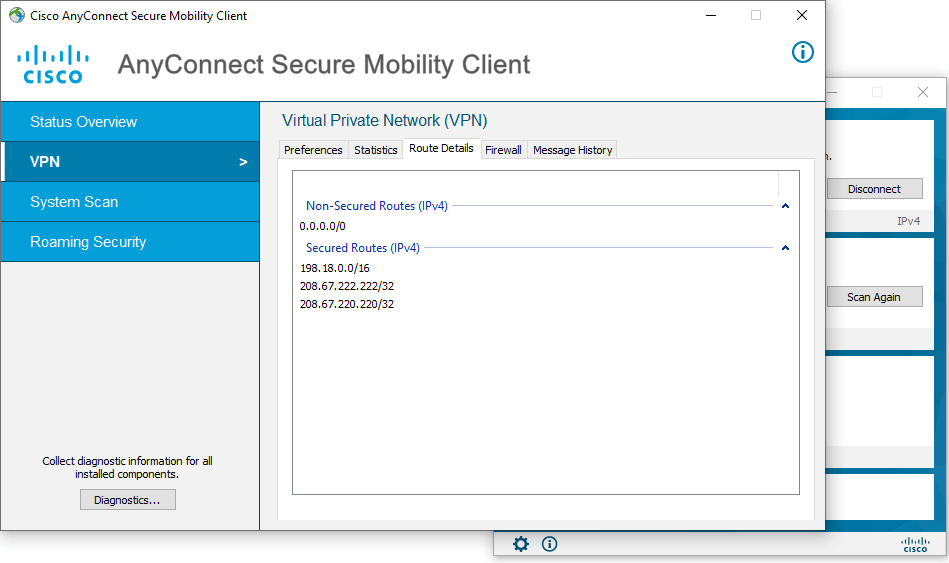
Assuming you’ve left things at the default, you should be greeted with the “You have successfully connected to client VPN.” banner, and then fully connected to your vMX. If you click the gear icon in the bottom left of the AnyConnect client window and then click into VPN > Route Details, you can see your split-include ACL reflected in the list of secured routes (along with whatever you selected as DNS servers, Umbrella in my case). If you chose to include your vMX in an existing Meraki AutoVPN mesh and have properly configured your remote-side routing, you can begin testing resource reachability at this time.
After a few minutes, you can check on the Network-wide > Clients for information about the list of active users

You can also navigate to Network-wide > Event Log to view AnyConnect connection events from there.

And with that, we have a basic AnyConnect configuration deployed on our Azure-based vMX, successfully working around the managed application permission constraints by pre-creating our vNet, subnet, and NSG for the vMX to use. This is a great option for quickly standing up a RAVPN solution in both Meraki and non-Meraki environments with hybrid or full-cloud architectures.